
Here is a sample focus chart, taken from one of the productions of the Nutcracker I designed; it contains most of the usual entries:
If a show is touring, it's obvious that there needs to be a written record of where each light is focused. If a show is just sitting in a theatre, then focus charts are needed in case a unit isn't tightened down properly and falls out of focus, or if the electrician has to break the focus in order to change a burnout. Even clearer are cases where a show is revived some years after the original production, or where the show has to move out of the theatre temporarily for a special event.
What Are Focus Charts?
Why Use Focus Charts?
So How Do They Work?
Measuring
I've had calls and messages from folks who happily print out Lightwright's focus charts, but then don't know what to do with them. The focus charts Lightwright prints are the kind most of the New York/Broadway designers use, and if you haven't worked there, you probably feel a little lost.
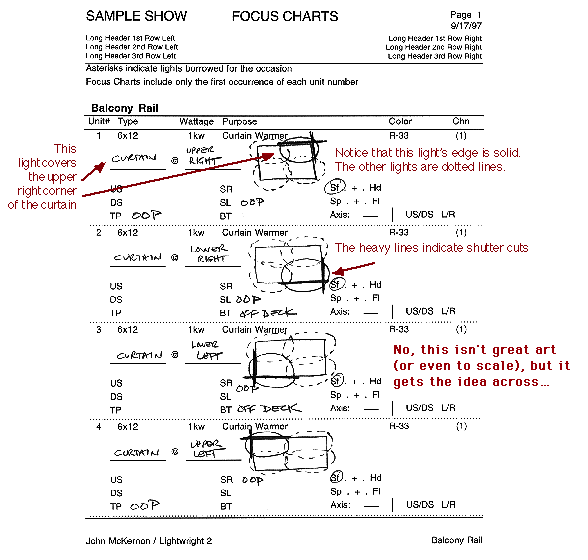
The stand-here-and-focus-like-this method works fine for most acting areas, but it rarely works for things like curtain warmers or template washes that streak dramatically across scenery. For those lights, you sketch little pictures showing what the light looks like on the object. It doesn't need to be overly artistic, but it does need to be clear.
Here is a focus chart showing some curtain warmers:
HOW FOCUS CHARTS WORK
Focus Charts are a way of recording in words and sketches where lights are aimed and how their shutters, barrels, and other options are set. They make it easy to accurately restore a lighting design's focus to the state they were in when the charts were created.
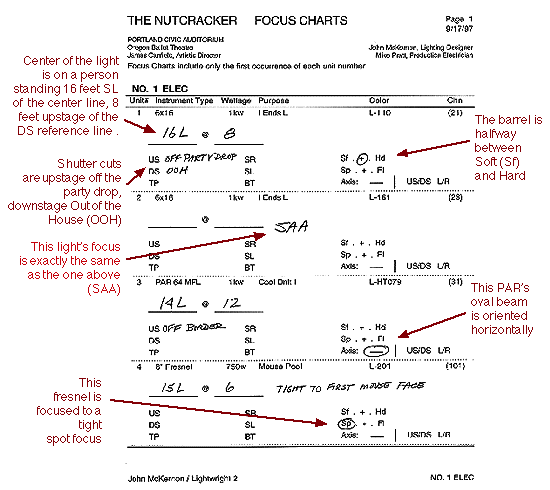
To focus each light light, you stand wherever the chart says to. The electrician points the light at you there. If you need to stand someplace downstage of your zero line, then the US/DS distance is shown as a negative number. If you need to be sitting down or standing on something when the light is pointed at you, be sure to include that in the chart.
Once the light is focused on you, the electrician locks it down and begins to make shutter cuts, which are indicated in the body of the chart below the dimensions.
US, DS, TP, and BT can sometimes mean the same thing: For example, a shutter cut on the top of a light may well be the same as an upstage cut. Fill in whatever parts of the chart make sense for each light, and leave the rest blank. It depends on where the light is pointing and what would be clearer to understand. If you're focusing a front-of-house light and you want to indicate a cut off masking borders overhead, you'd probably say "TP Off Borders" instead of "US Off Borders" just because it's more what you want to do.
If you want to indicate Soft or Hard edges, you circle Sf, Hd, or somewhere in between.
If you're using a fresnel and want to indicate Spot or Flood focus, you circle Sp, Fl, or somewhere in between.
If you're focusing a PAR or other light which has an oval beam, then you draw a little arrow in next to "Axis:" showing the orientation. You can also circle either the horizontal or vertical bar or L/R or US/DS instead of drawing an arrow. Whether the orientation is from the perspective of the light or the way it falls on the floor is up to you: just be consistent and include a note on your title page showing which way you did it.
Focusing From Focus Charts
Scenery & Other Oddities
You can measure upstage/downstage dimensions using whatever base line you think is appropriate for the show. The reference line could be the front of the stage, the front of the deck, the plaster line, the show portal, or even a prominent line in the deck. What's important is that you include a cover sheet with your focus charts showing where the zero point is, the date the charts were written, and a key to the abbreviations you used.
Abbreviations are used a LOT. Why? To save time. Focus time is expensive and often hectic, and no one wants to wait while the focus charts are filled in, although everyone knows that they are essential.
Here are some common abbreviations:
OOH Out of House
OOP Off of Portal
HH+1 (or whatever) Head Height plus one foot
OOS Off of Screen
SAA Same As Above
PROS Proscenium
PORT Portal
BK Back
DIAG Diagonal
BDR Border
@ At
< Angle
Abbreviations
And now you know everything I know about focus charts. When in doubt, write down whatever makes sense -- but never take anything for granted: The person reading the charts will NOT know what you mean unless you it is blindingly obvious. I'll never forget the first time I focused the national tour of Lettice and Lovage using someone else's paperwork: The focus charts said stand on the 4th step on the staircase. They didn't say 4 steps from the top counting down, or 4 steps from the bottom counting up, and they hadn't drawn a picture. To find out, we had to focus some of the lights counting from the top down, and when we found a light that couldn't make it's shot, it was clear the charts counted from the bottom up. So always write your charts as completely as possible!
Conclusion
Photos Instead of Hand-Drawn Sketches
In Lightwright, you can use a photo as the background for the sketch area of it's focus charts. Once the photo is in Lightwright, you can use it's drawing tools to show shutter cuts or hot spot, and add text on top of the photo to explain what the picture is showing.